How common it is that while doing a certain work over the web, we have encountered an error. What disturbs the user, even more, is if the user fails to understand what exactly the error is about and how to fix the issue at hand.
One amongst the many errors encountered is the Confirm Form Resubmission Error, and hence we have come up with the perfect fixes to help you resolve this problem. But before we go further deep on the methods, we would start with what exactly is the Confirm Form Resubmission Error.
What is the Confirm Form Resubmission Error?
Most of us have been pretty acquainted with Google Chrome as a browser. It is like a magical portal serving us all information regarding almost any topic we search for. But with every good thing comes some negative aspects.
Sometimes the user encounters some unprecedented errors like the Confirm Form Resubmission Error. What is more confusing and difficult for the user is to understand what the error message tries to convey and then to find a solution to it.
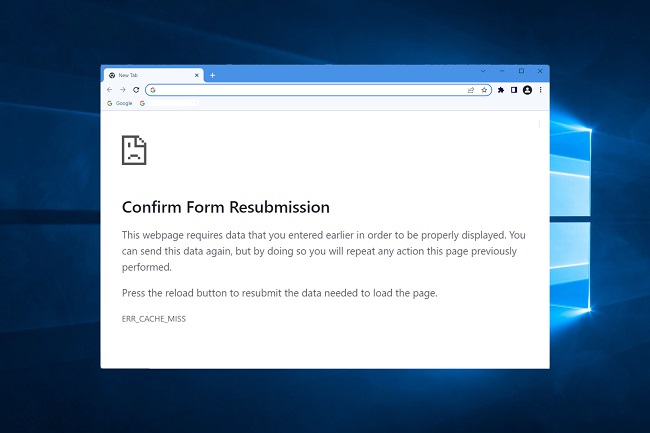
This error notifies the user to reload the page and resubmit the data needed to load the page. A non-specialist would most probably conclude this message to be an indication of an error, but in technical terms, it is a feature of Google Chrome. As we proceed with the article, we will have a better understanding of this statement.
Read Also:
What Are the Reasons Behind the “Confirm Form Resubmission Error” Dialog Box to Appear?
As mentioned above, this is more like a feature of Google than an error. What actually happens is if the internet connection is poor or if the user tries to click the back button in the middle of filling a form this pop-up message indicating the error message pops up.
Several users have complained about this error in multiple cases, but Google Chrome’s forward/backward movement is so weakly built that it becomes almost impossible to fix this problem. At times while filling out a form, we click on the back button.
The data from the user is transferred to the server from the user’s browser. On refreshing the page, what happens is the data gets lost, or the content of the page might be duplicated. In these cases, the Confirm Form Resubmission Error pops up.
This feature is essential to the browser because it is not advisable to have duplicate copies of the same data. Thus without this error, there might be chances of creation of two accounts with the same details. In spite of the logical advantages of this error, it often becomes a hassle to the user to face this issue.
Hence, in this article, we will illustrate to you how the error can be fixed efficiently.
How to Solve the Confirm Form Resubmission Error?
We have tried out several methods which have proved to be successful in resolving the issues faced by the Confirm Form Resubmission Error. We list down 10 different ways to fix the said error.
Method 1: Disable the Motion Across the Browser
According to some Users, this Confirm Form Resubmission Error isn’t necessarily a bug; it simply occurs because the browser cannot cache POST requests and tries to submit the form again on refresh. Moving forward/backward accidently is one of the primary reasons why this error message pops up.
So an easy solution to this problem is to disable motion across the browser. On touch-screen devices, you can avoid this problem by disabling the sliding option to move forward or backward. After disabling this option, there will not be a case where this error message pops up.
Method 2: Switching the POST Method
When we talk about how the data entered by the user in the form go to the browser, there are two methods which are as follows:
- The Post method
- The Get method
While using the POST method, the details that the user enters in the form does not get appended in the URL, and this ensures confidentiality and privacy of data entered by the user. Whereas if we use the GET method, the details entered gets appended to the URL, which thereby fails to maintain the proper measure of confidentiality of the user.
Thus, it is most preferable to use the GET method. However, if your web page is such that it allows the user to modify the data on the page, the POST method should be replaced by the GET method. To do so follow these simple steps;
Step 1: Replace POST in the URL with GET
One disadvantage of this method is that if you use Google Chrome regularly, this method might fail your purpose. Hence, we list down more ways in which this problem can be solved.
Method 3: Using Google Chrome Properties
Using some specific Google Chrome property might help fix the issue, and we thus list the steps which you must follow to remove the error by this particular method.
Step 1: Firstly, Right-click on the Shortcut icon of Google Chrome and select the Properties option.
Step 2: After following the previous step, a dialog box will pop up, and you will find a field name called Target.
Step 3: Now, you just need to add the text “–disable-prompt-on-repost” (Without quotes) at the end of the target.
Step 4: After doing so, change the above target URL with the below one:
Step 5: To check whether the same type of error message still pops up or not, close Google Chrome, and reopen it to find the changes.
However, if you are using this method as a solution to the error message, one thing is to be taken care of for sure. While using this method, you must have two shortcuts of the browser.
Each browser should serve its own browser because in certain cases we will find it ok to remove the error while in some other cases like when submitting credit card details you might get tricked into entering the data twice. To avoid those cases, we should use the other browser shortcut where this feature has not been implemented.
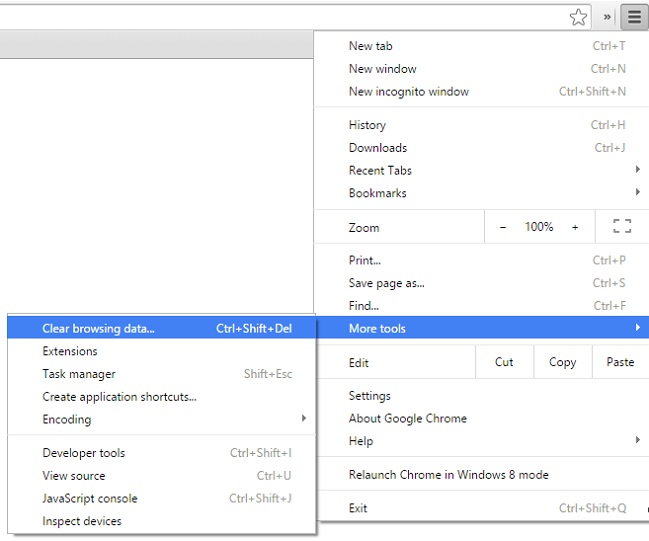
Method 4: Wiping the Google Chrome Browsing Data
The reasoning behind using this method is that we know that the browser sends an error message when it senses duplication, but if we force the browser to forget all the information that it has gathered from the user, there will be no question of data duplication anymore.
So to use this method, you simply have to delete the browsing data from time to time. While doing so, you must take care that you select all the options viz. Browsing history, cookies, passwords, cached data, media licenses, etc. Follow these easy steps, and this problem will be solved.
Step 1: First of all, go to the top right corner of your Google Chrome browser and click on the three vertical dots.
Step 2: Secondly, select More Tools>>Clear browsing data from the menu.
Step 3: Thirdly, navigate to Advanced Tab & select the data that you want to delete.
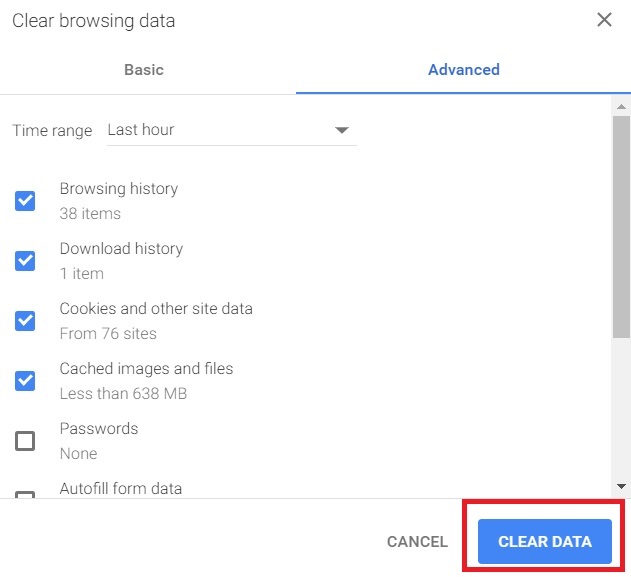
Step 4: Finally, click on clear data, and you will notice the changes.
If this method does not suit you, we will list several other methods for you.
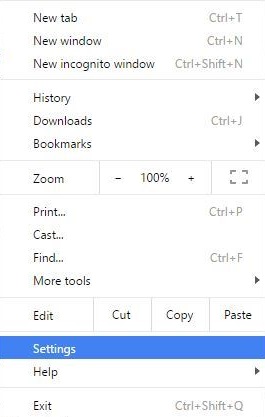
Method 5: Resting the Chrome Browsing Settings
Sometimes we find the Browser to be configured absurdly and we can fix it by a rather simple method. We just have to configure the browser settings as per our need. To do so, follow these easy steps.
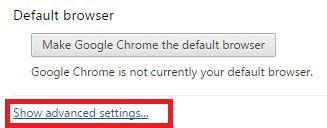
Step 1: First of all, go to the top right corner of your Google Chrome browser and click on the three vertical dots.
Step 2: Now, choose the Settings option from the menu.
Step 3: Scroll down till the end, and there you will find the Show Advanced settings, click on it.
Step 4: Find the option to Restore settings to their original defaults at the end of the page & click on it.
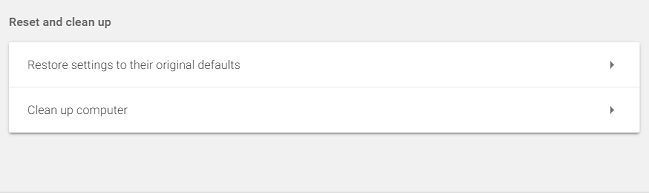
Step 5: Finally, click on the Reset Settings, and your problem will be solved.
Even if this method does not satisfy your needs, we have other methods which you can use to fix the issue. They are listed as follows.
Method 6: Disable the Damaged Browser Plugins and Extensions
One of the several causes behind the Confirm Form Resubmission Error is the presence of corrupted extensions. So an efficient solution will be to disable the corrupted extensions. The following steps will help you to disable the corrupted extensions with ease.
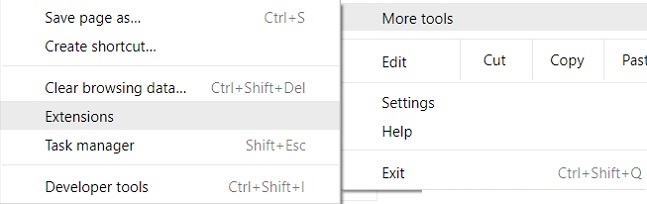
Step 1: First of all, go to the top right corner of your Google Chrome browser and click on the three vertical dots.
Step 2: Navigate to More Tools>>Extensions.
Step 3: Now, just find the corrupted extension from the list. You have to disable it & re-enable again simply.
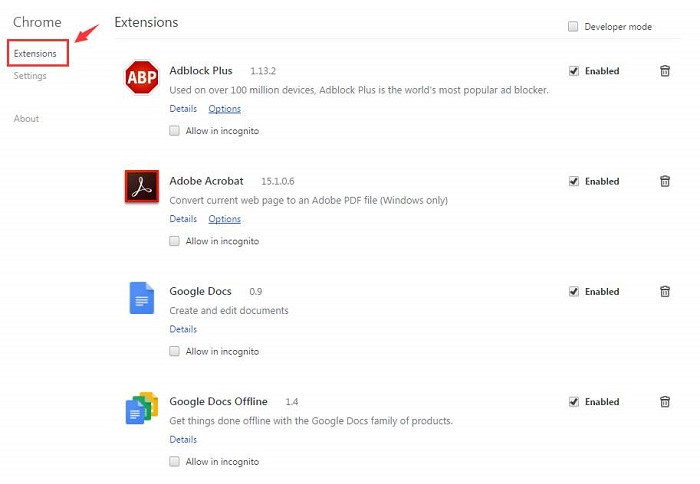
Step 4: After following all the aforementioned steps simply recheck the page and see if the errors have been removed or not.
There are a few more methods which will help you solve the issue if it hasn’t already been solved.
Method 7: Using AJAX Submit Button
There is a particular AJAX function of jQuery which does not allow the form to be reloaded after the form is submitted. You have just to add the following function in your page’s code.
(Enter code)
Here, the ajax() function simply processes the data entered in the form as per the PHP file provided as the URL property and if the data is validated, it concludes that it was a successful submission of the form data and thus it returns false.
By doing so, even if the page is reloaded, it no more sends a new request, and the error message does not pop up anymore. If you still feel that you haven’t got the proper solution to your problem, then there is yet another method for you. This solution tells you to add a tag inside the <head> part.
Method 8: Use the PRG Pattern
PRG stands for POST/Redirect/GET pattern. As we are familiar with the data entered by the user in the form enters into the form by the P-POST part of the PRG pattern. But if we apply the PRG pattern entirely, then the Confirm Form Resubmission Error does not take place any more.
To implement this, you should design the webpage in such a way that it does not post the data directly to the server. This problem’s solution will be if you add one page between that page and the actual page.
By this, you can post the data in one page, process it on another page and finally submit it to the browser. Thus, the last method that the browser will remember would be GET instead of POST. The error message will not pop up anymore.
Here is an example of what is explained.
(Enter example)
Method 9: Adding a tag Inside the <head> Part
This method would only work if you see that the website is initializing the request, and the user is refreshing the page. Get access to the source code of the web page and then simply add the following tag.
(Enter tag)
Method 10: Delete No-Store
If we use a form with a particular header, then using this method will be an effective solution.
(Enter header)
The real problem often lies in the header, and you should follow these steps to rectify it.
Step 1: Firstly, simply try to delete (‘no-store’) from the header.
Step 2: You should now refresh the page within the form.
Step 3: To check whether the problem is fixed or not re-enter the form and refresh it.
While we discuss all these comparatively complex methods to fix the issue at hand, we shouldn’t neglect the silliest reason why this Confirm Form Resubmission Error occurs. You need to check whether your internet connection is stable or not.
If the connection is poor, you may think about switching it off and on. This method, at times, helps and is worth giving a try.
Read More:
- ERR_EMPTY_RESPONSE
- ERR_CACHE_MISS Error
- How to Find Steam Screenshot Folder
- Steam Missing File Privileges Error
- Digital TV Tuner Device Registration Application
Conclusion
These are the most effective solutions to fix the Confirm Form Resubmission Error. However, one slight disadvantage is that these methods should be followed periodically, but what is essential is that these are still quite efficient solutions to this error. We have heard several positive messages from users who have already applied these methods; we hope you will also be benefited.